1
2
3
We just need your E-Mail and shipping address.
Feel free to add more samples to your sample cart afterwards.
We just need your E-Mail and shipping address.
Feel free to add more samples to your sample cart afterwards.
planeo DIYTile tiles revolutionise conventional tiling with their loose-floating installation method. The advantages over conventional tiling are the enormous time savings and the residue-free removal.
The entire strength of the floor is created by the enormous flank adhesion of the joint to the system panel.
Important to note: The grouting of the system floor may only be carried out with the corresponding planeo special grout!
planeo is the brand for professional solutions with tested quality. In our extensive range, you will find first-class products for home and garden, from floors to wall coverings to decking: we offer you suitable items with a top price-performance ratio for almost every requirement and budget. We also have product lines such as carpets, wall paints, wallpapers and doors. The range of attractive offers for walls, floors and patios is rounded out by high-quality accessories and effective cleaning and maintenance products. Meanwhile, planeo's services go beyond the trade in floor coverings. We put great emphasis on the idea of service in everything we do. We deal with the topics of material, handling and realisation in such detail that we can provide you with an adequate solution for many different situations on the building site. To make things more clear, you can find useful tips and instructions in our guides with articles and videos. Beautiful flooring and more? Realise easily with planeo.
| item no. | pf432315HDT |
|---|---|
| Manufacturer | planeo |
| Format | 30 x 60 cm |
| Refinement | HyTect |
| Type | Floor tile |
| Material | Ceramics |
| Structure | Ceramics + Cork |
| Length in mm | 297 |
| Width in mm | 597 |
| Thickness in mm | 12.5 |
| Colour | beige |
| Look | Stone effect |
| Piece per package | 1 |
| Installation type | loose-laying |
| installation pattern | Tile format |
| suitable for | Bath, Kitchen, Bedroom & living room, Hallway & Corridor |
| Product standard | Bl a UGL |
| Load group | 2-3 |
| Underfloor heating | suitable |
| Special features | Anti-mould, DIY Tiles, Environmentally friendly, Non-slip |
| Slip resistance | R10 |
| EAN | 4062212062289 |
| Shipping group | L |
| Range of application | Residential, Commercial |
| Weight | 4,43 kg/Packing |
| Package Content | 0.18 m² |
|
Show all data ▼
|
|
| Downloads | |
|
|
|
|
|
|
We will help you with your questions!
A specialist adviser will be happy
to advise you personally.
Variant: DIY-Instruction
 button
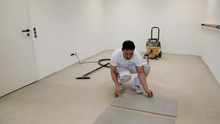
The substrate should be permanently dry, load-bearing and even. Any unevenness should be sanded down and filled with a floor levelling compound.
ATTENTION: Observe the tolerance value of max. 2 mm per linear metre, so that the butt edges of the tiles remain nice and even. The surface to be laid can now be cleaned with a hoover.
The tiles should be stored in the room where they are to be laid for at least 24 hours before installation. This will allow the material to acclimatise to the room temperature and it will not "work" so hard after the installation.
 button
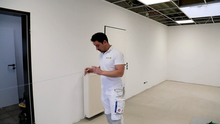
Measure the room exactly and plan the installation. To do this, you can determine the centre of the room with the help of a chalk line. Then mark the starting line.
Before laying the flooring, it is imperative that you follow the official laying instructions that are included in every package, otherwise any claim under warranty and guarantee will be invalidated!
 button
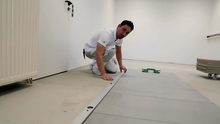
Now you can start laying the tiles. To do this, place the first tile well aligned with the markings. With the help of a suction cup, the other tiles are laid along the markings. As soon as the first strip is in place, the next tiles can be laid butt to butt with the tiles already in place.
ATTENTION: A distance of at least 8 mm must always be maintained between the flooring and the wall as well as to all fixed components.
 button
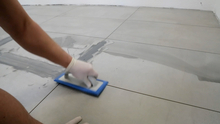
Mix the joint provided for this purpose, taking into account the mixing ratios. The joint can then be filled into the spaces between the tiles using a spatula or trowel. Fill up to two rows at a time and wipe off the joint with a sponge board. When doing this, wipe against the joint so that the compound can spread well in the gaps.
 button
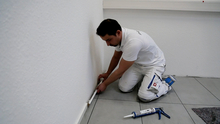
Finally, the skirting boards can be fitted.
Material:
Tools:
optional:
Working time:
Difficulty level:
.
Are you looking for a lower price? Just ask us for an individual offer!