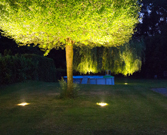
planeo garden lighting set - Nova 5
5 years warranty
- Light colour: 3000 K at 320 lumen
- average life: 20,000 hours
- 1 stainless steel LED light 12V - 5W
- mounting material (screws and dowels)
- Installation base
- Connecting piece 137A
- Ground spike
planeo is the brand for professional solutions with tested quality. In our extensive range, you will find first-class products for home and garden, from floors to wall coverings to decking: we offer you suitable items with a top price-performance ratio for almost every requirement and budget. We also have product lines such as carpets, wall paints, wallpapers and doors. The range of attractive offers for walls, floors and patios is rounded out by high-quality accessories and effective cleaning and maintenance products. Meanwhile, planeo's services go beyond the trade in floor coverings. We put great emphasis on the idea of service in everything we do. We deal with the topics of material, handling and realisation in such detail that we can provide you with an adequate solution for many different situations on the building site. To make things more clear, you can find useful tips and instructions in our guides with articles and videos. Beautiful flooring and more? Realise easily with planeo.
| item no. | 116S |
|---|---|
| Collection | GardinoLights |
| EAN | 5907800856910 |
| Height in mm | 180 |
| Length in mm | 100 |
| Manufacturer | planeo |
| Piece per package | 1 |
| Shipping group | S |
| Type | Spotlight |
| Warranty | 5 Jahre |
| Weight | 1,10 kg/Packing |
| Width in mm | 120 |
| suitable for | Garden |
| Package Content | 1 Pc |
|
Show all data ▼
|
|
| Downloads | |
|
|
|
|
|
|
|
|
|
We will help you with your questions!
A specialist adviser will be happy
to advise you personally.
☎ +49 5222 960 4810
Mon - Fri: 9am - 6pm
Sat: 9am - 2pm
Variant: DIY-Instruction
 button
Before mounting the luminaires, determine the position of the transformer and connect it. Choose the position of the transformer so that it is centrally located and allows short cable runs. Next, plan the position and type of lighting. Once you have determined the positions, the main cable is distributed and connected to the transformer. Insulate the cut edges with the caps provided. Now hide the cable. The procedure varies depending on the type of lighting.
ATTENTION: Calculate which transformer is needed. To do this, you should pay attention to the wattage of the lamp you want to use. These wattages per spot are added to the number of lamps. This results in the transformer. We recommend that you choose the next largest transformer so that more spots can be connected later.
 button
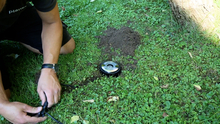
- Floor spotlights:
For dimmable and non-dimmable floor spots, it is important to remember that the cable must be buried if it cannot be covered with paving stones/patio slabs/patio boards.
ATTENTION: Dig the cable deep enough into the ground so that it is not damaged when scarifying/lawn mowing.
 button
- Recessed luminaire:
Here, the cable is hidden under the substructure of the composite decking boards or in the chippings under decking slabs or paving stones.
 button
- Free-standing luminaire:
Depending on the location (patio or walkway lighting), the cable is hidden under the patio or in the ground.
 button
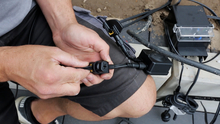
After the cable has been hidden, you can attach separate circuits as desired. Paths and bushes can be switched separately if you interconnect a receiver with a T-connector to the main cable.
 button
You can also integrate our motion detectors into our system to light up certain areas only when you are there.
The further procedure for fixing the lighting also differs depending on the type of lighting.
 button
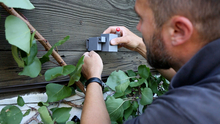
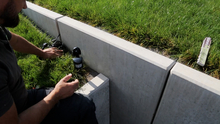
- Wall & floor luminaire:
Now attach the wall lights or free-standing luminaires. Use the fixing material supplied to screw the wall lights into the substrate. Mark the points with a pencil, which are then drilled. Then hammer the dowels into the pre-drilled holes. Before screwing on the luminaire, we recommend sealing the drill holes with silicone to protect against moisture penetration. Now connect the luminaires to the connector using the main cable.
 button
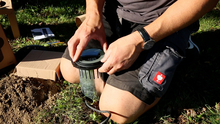
- Floor spotlight:
Once the cable is connected, prepare the spotlights. This involves placing the light bulbs in the spotlights. Dig holes so that the recessed spotlights can then be placed in the ground or subfloor. The mounted lights are now connected to the cable with a T-piece. Finally, you can bury the cable or hide it under stones.
ATTENTION: Before inserting the lamp into the ground, you can adjust the light intensity on the back of the dimmable lamp by means of a push button.
 button
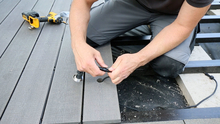
- Recessed luminaire:
First, the first composite decking boards can be laid up to the first recessed light mark. Drill the marked areas with a hole saw and connect the recessed luminaire to the main cable using the T-connector. Check that the recessed luminaire is working properly before proceeding with the installation of the next boards.
Material:
- Transformer
- Traction cable
- Outdoor lighting
optional:
- Extension cable
- Connector
- Dowels
Tools:
- Garden shovel
- Cutter knife
- Folding rule
- Drill
- Hammer
Difficulty level:
- easy
 button
 planeo lighting system garden lighting with LED outdoor lights
 button
 planeo terrace and outdoor lights
 button
 Outdoor lights tips & ideas - easy to lay it and fix it yourself
 button
 outdoor lights with BPC - fence elements and outdoor lights ideas & tips
 button
 Designing a small terrace with WPC tiles, privacy fence and lighting
 button
 Privacy screen in the garden with slope & garden fence lighting
 button
 Planning and installing LED outdoor lights with planeo
Individual offer?
Are you looking for a lower price? Just ask us for an individual offer!