1
2
3
We just need your E-Mail and shipping address.
Feel free to add more samples to your sample cart afterwards.
We just need your E-Mail and shipping address.
Feel free to add more samples to your sample cart afterwards.
The Oak Trunk Collection brings natural wood and stone looks into your room. The qualitative oak design exudes a warm and rustic character.
planeo is the brand for professional solutions with tested quality. In our extensive range, you will find first-class products for home and garden, from floors to wall coverings to decking: we offer you suitable items with a top price-performance ratio for almost every requirement and budget. We also have product lines such as carpets, wall paints, wallpapers and doors. The range of attractive offers for walls, floors and patios is rounded out by high-quality accessories and effective cleaning and maintenance products. Meanwhile, planeo's services go beyond the trade in floor coverings. We put great emphasis on the idea of service in everything we do. We deal with the topics of material, handling and realisation in such detail that we can provide you with an adequate solution for many different situations on the building site. To make things more clear, you can find useful tips and instructions in our guides with articles and videos. Beautiful flooring and more? Realise easily with planeo.
| item no. | PLDD2570-CHE |
|---|---|
| Manufacturer | planeo |
| Collection | Object Oak Log |
| Length in mm | 1219 |
| Width in mm | 229 |
| Thickness in mm | 2.5 |
| Wear layer | 0,70 mm |
| Wear class | 41 Industrial (light) |
| Joint | Micro bevel |
| suitable for | Bath, Bedroom & living room |
| installation pattern | Plank pattern (1-plank) |
| Installation type | glue |
| Sorting (grain) | natural/classic |
| Look | Wood effect |
| Underfloor heating | suitable |
| Special features | Suitable for humid rooms, Waterproof |
| EAN | 4062212083802 |
| Structure | Full vinyl |
| Piece per package | 12.0 |
| Style | Vintage |
| Slip resistance | R10 |
| Shipping group | M |
| Colour | brown |
| Range of application | Residential, Commercial |
| Weight | 14,33 kg/Packing |
| Package Content | 3.34 m² |
|
Show all data ▼
|
|
| Downloads |
We will help you with your questions!
A specialist adviser will be happy
to advise you personally.
Variant: DIY instruction wet bed bonding & Silent Stick
 button
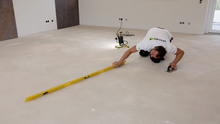
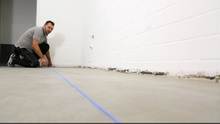
The substrate should be permanently dry, load-bearing and even. Any unevenness should be sanded down and filled with a floor levelling compound. The surface to be laid can then be cleaned with a hoover.
CAUTION: Never install Silent Stick over a soft subfloor, e.g. carpet, cork or any type of foam underlay.
 button
The vinyl planks should be stored horizontally in the room in which it is to be installed for at least 24 hours before installation in the packages. This will allow the material to acclimatise to the room temperature and not "work" so hard after the installation.
Before laying, it is imperative that the official laying instructions, which are included in every package, are followed, otherwise any claim to warranty and guarantee will be invalidated!
Silent Stick (alternative to adhesive):
 button
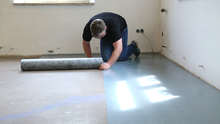
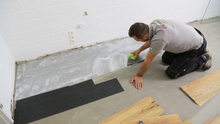
Now you can lay out the sheets in the opposite direction to the direction in which the top layer is laid. The foil side should always face upwards. Simply cut the Silent Stick to size with a cutter knife.
 button
As soon as the strips have been laid butt to butt, the foil is removed area by area (approx. 2 planks wide) and the vinyl planks can be glued on and pressed down.
ATTENTION: There must always be a gap of approx. 5mm between the flooring and the wall and between the flooring and all fixed components.
 button
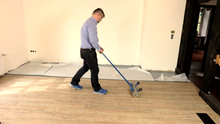
Afterwards, the laid surface is rolled with a roller and the skirtings can be fixed. Please note the drying times of the adhesive. If you have a large area, we recommend that you roll the laid planks after approx. 20-30 minutes so that no air bubbles form.
Classic wet-bed gluing:
 button
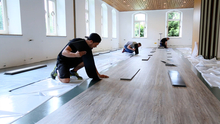
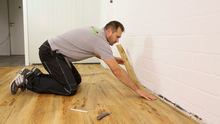
Before applying the adhesive, open the packages and lay the elements from different packages in alternation to obtain an even decorative pattern in the area. Mark the reference points using a chalk line and cut the vinyl planks to size with a cutter knife. The planks can now be broken by simply folding them.
 button
Apply the adhesive with a notched trowel and lay the vinyl planks in the wet bed, observing the flash-off times of the adhesive. The elements should be placed in the adhesive with little tension and with tight joints and pressed on. When doing so, observe the laying direction on the back of the vinyl planks.
ATTENTION: A gap of approx. 10mm must always be maintained between the flooring and the wall as well as to all fixed components.
 button
The laid surface is then rolled with a roller and the skirting boards can be fixed. Please note the drying time of the adhesive. The glued surface should be rolled after approx. 20-30 minutes so that no air bubbles form.
Material:
Tools:
optional:
Working time:
Difficulty level:
Gluing vinyl flooring - installation guide for vinyl sheets
Gluing vinyl flooring to old flooring in large rooms - planeo silent stick
Vinyl flooring XXL sticking on self-adhesive impact sound insulation
Redesigning a guest WC - sticking vinyl flooring to walls
Laying vinyl tiles on self-adhesive insulation in the WC
Clicking or sticking vinyl flooring
Grouting vinyl tiles
Subfloor testing before laying flooring
Gluing vinyl flooring to steel stairs with concrete steps
Floor spackling for vinyl flooring gluing
Vinyl flooring wear layer 0.3 or 0.5mm. Does a high wear layer protect against scratches?
Replacing damaged vinyl planks on self-adhesive impact sound insulation planeo Silent stick
Are you looking for a lower price? Just ask us for an individual offer!
 button
  button
  button
  button
  button
  button
  button
  button
  button
  button
  button
  button