1
2
3
We just need your E-Mail and shipping address.
Feel free to add more samples to your sample cart afterwards.
We just need your E-Mail and shipping address.
Feel free to add more samples to your sample cart afterwards.
The TITANWOODWPC plank, which is only available from planeo , surpasses the material of conventional WPC in every respect and achieves top values that exceed the European standard EN15534.
Please note: Fluctuating colour variations between the WPC planks are due to the material and production. After some time of weathering, the colours will even out.
Compared to first generation WPC, TitanWood brand planks are clearly superior. The WPC decking boards test according to EN standard 15534 shows: TitanWood is more resilient, easier to maintain, more durable, more impact resistant and more moisture resistant than conventional WPC boards. With a 2.5 higher load-bearing capacity, the high-density TitanWood WPC exceeds the load values specified by the Euro standard for composite materials such as WPC decking boards. With TitanWood, you get a particularly high-quality product in guaranteed long-lasting quality - far beyond the European standard.
| item no. | HGM-SS_conf |
|---|---|
| Manufacturer | TitanWood |
| Width in mm | 143 |
| Thickness in mm | 22 |
| Top / bottom | rough sawn/structured |
| Material | WPC / BPC |
| Look | Wood effect |
| Special features | Reversible |
| EAN | 4062212001691 |
| Profiles | Solid plank |
| Shipping group | XL |
| Type | Clip system |
| suitable for | Pool surround, Balcony |
| Package Content | 9 rm |
|
Show all data ▼
|
|
| Downloads |
We will help you with your questions!
A specialist adviser will be happy
to advise you personally.
Variant: Renew existing terrace
 button
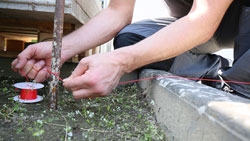
First determine the total construction height of the WPC composite decking boards to be installed. The terrace construction consists of the substructure (chippings, weed fleece, lawn edges) and the terrace construction (terrace pad, substructure, WPC planks). Check whether existing edges of the old terrace can be used for the necessary height. Tighten cords to be able to measure the heights. Also take into account the slope of 2% away from the house.
 button
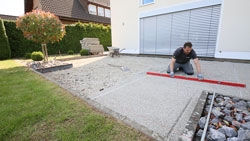
Spread chippings on the compacted gravel roughly with a wheelbarrow and shovel. Level the surface with a spirit level on two long metal poles embedded in the chippings. Check the required construction height and the slope with at least two taut strings. Start in one corner and work your way through the entire area, one row at a time.
 button
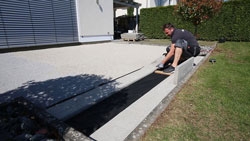
First roll out a sheet of weed mat, starting from the outer edge. In the next step, immediately lay the kerb stones on top with a distance of 2 cm from the edge of the patio. A homemade template as a spacer makes it easier to lay the subsequent kerbstones on the fleece. Where higher loads are to be expected on the terrace, you should place the kerbstones closer together.
 button
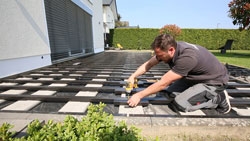
The WPC substructure requires 2cm edge distance in all directions. The parallel distances of the WPC substructure should be between 30-40cm. Mark the exact positions with a chalk line. Lay out the substructure on decking pads. Bridge the joints parallel to each other with a piece of substructure. Always check and correct the evenness of the surface with a spirit level during installation. Dowel all ends of the substructure around the edge of the terrace and on the surface. Reinforce the joints of the WPC composite decking boards with additional substructure so that the ends do not hang more than 5 cm freely in the air. Now stick the supplied EPDM spacer tape onto the full length of each substructure.
 button
Mark all planned lamp positions before you start laying the boards. Unroll the 12V cabling completely along the markings. Leave the cable ends freely accessible and cover unused ones with caps. Then install the lamps completely and at the same time as laying the floorboards. Drill the appropriate holes and bring the connectors into contact with the laid-out cable. Check the lamps immediately for proper function. Finally, clamp the cable to the transformer and position it in the floor tank or near a socket. Use a safebox if the socket is in the ground.
 button
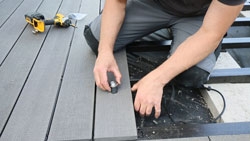
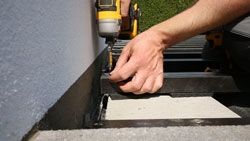
To start laying the composite decking boards, first screw the starting clips onto each substructure with a distance of 2 cm to the wall. Then lay the composite decking boards and shorten them if necessary. Then position the centre clip, pre-drill and fix the composite decking boards to each substructure with the stainless steel screws provided. Make sure you use the correct torque on the cordless screwdriver. Refer to the installation instructions for the correct spacing at the head joints. Cut the last row of WPC composite boards lengthwise with a circular saw. Pre-drill them and screw them to each substructure. Now you can enjoy your new Titanwood terrace.
Material:
optional:
Tools:
optional
working time:
Difficulty level:
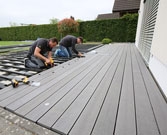
Laying planeo TitanWood decking boards
Quality differences in WPC decking boards - 8-year-old WPC decking tested
Redesign a paved terrace with planeo XXL WPC planks
Laying planeo WPC decking boards on old concrete slabs - terrace renovation
Laying roof terrace flooring WPC planks from Planeo
WPC decking board break test - standard WPC decking board vs. planeo TitanWood
WPC planks in severe in autumn weather
WPC decking boards in winter care and handling
WPC terrace in spring
WPC planks on aluminium substructure for heavy-duty use
Quality terrace - XXL WPC decking boards installation by Planeo
Cleaning and maintaining WPC decking boards
Are you looking for a lower price? Just ask us for an individual offer!
 button
  button
  button
  button
  button
  button
  button
  button
  button
  button
  button
  button