1
2
3
We just need your E-Mail and shipping address.
Feel free to add more samples to your sample cart afterwards.
We just need your E-Mail and shipping address.
Feel free to add more samples to your sample cart afterwards.
Properties:
Substrate:
Must be clean, dry and load-bearing, free of oil and grease. Prime highly absorbent substrates with planeo Tiefgrund first. Precoat non-absorbent substrates with planeo Priming Paint WP. Before applying the coating, check the suitability of the material/substrate by applying a test coat and observe the VOB, Part C, DIN 18363, Para. 3 and the relevant
BFS data sheets must be observed.
Area of application:
Interior, on new and old load-bearing substrates, e.g. plaster, gypsum plaster, concrete, glass decorating fabric, fleece, woodchip, plasterboard (without lignin bleeding).
planeo is the brand for professional solutions with tested quality. In our extensive range, you will find first-class products for home and garden, from floors to wall coverings to decking: we offer you suitable items with a top price-performance ratio for almost every requirement and budget. We also have product lines such as carpets, wall paints, wallpapers and doors. The range of attractive offers for walls, floors and patios is rounded out by high-quality accessories and effective cleaning and maintenance products. Meanwhile, planeo's services go beyond the trade in floor coverings. We put great emphasis on the idea of service in everything we do. We deal with the topics of material, handling and realisation in such detail that we can provide you with an adequate solution for many different situations on the building site. To make things more clear, you can find useful tips and instructions in our guides with articles and videos. Beautiful flooring and more? Realise easily with planeo.
| item no. | pl-Woodstock |
|---|---|
| Manufacturer | planeo |
| EAN | 4062212165980 |
| Colour | yellow |
| Color type | Dispersion paint |
| Type | Tint colour |
| Suitable for substrate | Fleece, Plaster, Rigips, Woodchip, Concrete |
| Gloss level | matte |
| Opacity (DKL) | 1 - highest opacity |
| Wet abrasion (NAK) | 1 - highly abrasion resistant |
| Processing | streichen, rollen, spritzen (airless) |
| Drying time | bei 23°C und 50% Luftfeuchtigkeit nach einigen Stunden oberflächentrocken und überstreichbar |
| Shipping group | XS |
| suitable for | Interior |
| Variant | 2,5 L |
| Weight | 2,50 kg/Packing |
| Package Content | 2.5 l |
|
Show all data ▼
|
|
| Downloads | |
|
|
|
|
|
|
|
|
|
We will help you with your questions!
A specialist adviser will be happy
to advise you personally.
Variant: DIY-Instruction
 button
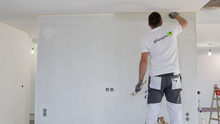
The first step is to prepare the walls and ceiling. To do this, fill the surfaces over the entire surface and thinly sand them. Then sand off any unevenness. First clean the wall surfaces thoroughly, and apply a primer coat so that the paint can adhere well. Allow the surfaces to dry for about 12 hours.
Tip: For the base coat, you can dilute some paint with approx. 7 % water, and spread it on the wall.
 button
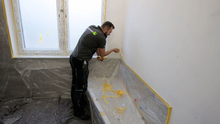
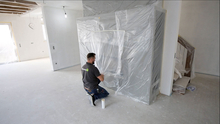
We recommend masking off the windows and other permanently installed objects. For this purpose, use a high-quality masking tape and adhesive foil, as otherwise unsightly splices may occur. The floor can also be protected from paint stains by spreading a painter's fleece over it.
 button
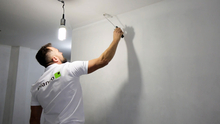
Seal the corners with a painter's acrylic before painting. Now start painting. First, paint the corners and edges of the ceiling with a small roller so that the edges do not stand out from the surface later.
Tip: To avoid paint edges, you can cut off the edge of the paint roller with scissors.
 button
Open the paint bucket and whisk the paint well. You can whisk two paint buckets and position them in different parts of the room so that you can work in one piece. Dip the paint roller into the paint and always make sure that no colourless spots have remained on the roller. Now the ceiling can be painted. Keep up the same pace to avoid unwanted streaks.
ATTENTION: Please be aware that objects such as stairs, fireplaces etc. need to be sealed and painted. In this case, the tape should be removed before the acrylic cures.
 button
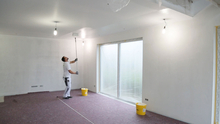
Again, paint the corners first with a small roller, then the full surface. The paint roller should be dipped completely into the paint and briskly spread over the walls. Finally, the masking tape can be removed.
Tip: If several colours are used, you can also use masking tape on the cut edges to avoid colour runs.
Material:
Tools:
optional:
Working time:
Level of difficulty:
Priming the ceiling with planeo Hydro PowerGrip Gel
The 5 most common mistakes when painting
Painting the ceiling without stripes with planeo interior paint ExcellentMatt
Painting ceilings & walls - tips and tricks from the pros
Painting the bathroom - The right colours for the bathroom
Painting a new building - what colour should I use?
Wallpapering a non-woven wallpaper
Renovation painting - paint/refresh wall & ceiling
Are you looking for a lower price? Just ask us for an individual offer!
 button
  button
  button
  button
  button
  button
  button
  button