1
2
3
We just need your E-Mail and shipping address.
Feel free to add more samples to your sample cart afterwards.
We just need your E-Mail and shipping address.
Feel free to add more samples to your sample cart afterwards.
Planeo wallboard panels are particularly suitable for use in kitchens and bathrooms because of their everyday-friendly properties. They can also be used without problems in commercial areas such as restaurants, shopping centres, hotels or airports.
To ensure a clean installation, the subfloor should be clean, even, free of grease & dust. Please follow the video instructions to avoid installation errors.
planeo is the brand for professional solutions with tested quality. In our extensive range, you will find first-class products for home and garden, from floors to wall coverings to decking: we offer you suitable items with a top price-performance ratio for almost every requirement and budget. We also have product lines such as carpets, wall paints, wallpapers and doors. The range of attractive offers for walls, floors and patios is rounded out by high-quality accessories and effective cleaning and maintenance products. Meanwhile, planeo's services go beyond the trade in floor coverings. We put great emphasis on the idea of service in everything we do. We deal with the topics of material, handling and realisation in such detail that we can provide you with an adequate solution for many different situations on the building site. To make things more clear, you can find useful tips and instructions in our guides with articles and videos. Beautiful flooring and more? Realise easily with planeo.
| item no. | 138355 |
|---|---|
| Manufacturer | planeo |
| Length in mm | 2600 |
| Width in mm | 1220 |
| Thickness in mm | 4 |
| Material | Aluminium composite |
| suitable for | Shower, Bath, Kitchen, Bedroom & living room, Hallway & Corridor |
| Installation type | glue |
| Special features | Seamless, Suitable for humid rooms, XL Size |
| EAN | 4062212050491 |
| Collection | Wallboard |
| Piece per package | 1.0 |
| Shipping group | M |
| Weight | 19,75 kg/Packing |
| Package Content | 3.17 m² |
|
Show all data ▼
|
|
| Downloads | |
|
|
|
|
|
|
|
|
|
|
|
|
We will help you with your questions!
A specialist adviser will be happy
to advise you personally.
Variant: DIY-Instruction
 button
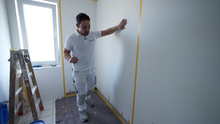
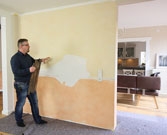
The substrate must be clean, even, dry and free of separating agents before installation. Plan and tape the surface on which the aluminium composite panels are to be glued in advance.
Before laying, it is imperative that you follow the official laying instructions that are included in every package, otherwise any claim to warranty and guarantee will be invalidated!
 button
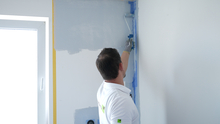
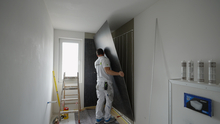
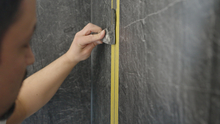
If you want to install the aluminium composite panels in the shower area, the substrate should be sealed beforehand. First seal the bathtub waterproofing and then the wall surfaces. Apply the Mapegum to the thick surface of the bathtub area and carefully press the seal on with a spatula to prevent air infiltration. Next, apply the corner sealing tape. Here, too, the Mapegum should be applied nice and tight with a roller. The corners and wall junctions are also sealed. Finally, roll the surfaces with the Mapegum. After the first coat, the tape should be removed immediately, as it cannot be removed without leaving residue after the drying time. As soon as the coating is dry, tape the surface again nicely and apply the Mapegum a second time over the entire surface. Again, remove the tape immediately.
 button
As soon as the course of the panels has been decided, cut the panels to size with a cross-cut saw and sand the newly created cut edges. Take measurements and drill holes for the water connections. Before gluing, hold the panel against the wall and check that the measurements are correct. Now apply the adhesive horizontally to the wall at a distance of approx. 15 cm. Now remove the protective film from the back of the board and press the board down with a spirit level. This allows you to check at the same time whether the boards are level. Now the end profiles can be cut to size and placed against the board. Tile levelling wedges can be used for a flush transition between the individual composite panels.
ATTENTION: Please keep a distance of at least 1-2 mm to the floor.
 button
When all tiles are in place and the adhesive has cured, carefully tap the wedges with a hammer. Tape the panels back down and seal the gaps between the panel and the shower tray (or other objects) with silicone. Fill the gaps with silicone and neaten them. Finally, grout the panel joints with grout. Wash off the excess grout with clear water as soon as the compound has dried.
Material:
Tools:
optional:
Wall subfloor test subfloor preparation for a wall cladding
Buy wood facing wall cladding - planeo Indo
Redesigning walls in the living room with planeo wooden slats
Attaching antique wood facing planeo Indo
Sticking kitchen backsplash onto old tile backsplash
Redesigning walls with paint & composite panels
Installing a shower back panel with planeo wallboard
Renovate shower without tiles with large-format panels
planeo wall facing - wall claddings - wall coverings - bathroom wall renovation
Wall claddingin concrete look
Bathroom redesign - renovate the floor and the walls in an old bathroom with planeo
Drywall lightweight cladding walls - gluing self-adhesive wall cladding to chipboard
Are you looking for a lower price? Just ask us for an individual offer!
 button
  button
  button
  button
  button
  button
  button
  button
  button
  button
  button
  button