The pine façade with thermal treatment, with the extra dimensional stability, durability and weather resistance for your façade project.
- Durability and resistance class Due to the thermally treated wood in a 3-step process, the rhombus strip has a high dimensional stability and resistance class and defies strong weather conditions.
- Colour development Weathering processes develop a natural silver-grey colour. If you want to preserve the brown colour of the rhombus strip, maintain the Thermo Pine with wood oils suitable for this purpose.
- Ventilated system The thermo pine substructure forms a delimited space of the pre-hung cladding to the masonry and thus the following advantages:
- Moisture barrier to the masonry
- continuous removal of moisture
- rapid drying of damp walls
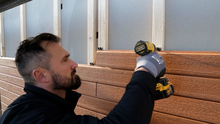
- Simple installation The façade can be installed quickly and easily using the Press and Click system.
- Easy maintenance The façade can be easily cleaned with a brush and water.
An additional surface treatment based on quartz sand offers a much higher UV resistance compared to other wooden façades.
- thermally treated
- simple & quick assembly
- dimensionally stable
- UV-resistant
- durable
- resin-free
- ventilated
planeo is the brand for professional solutions with tested quality. In our extensive range, you will find first-class products for home and garden, from floors to wall coverings to decking: we offer you suitable items with a top price-performance ratio for almost every requirement and budget. We also have product lines such as carpets, wall paints, wallpapers and doors. The range of attractive offers for walls, floors and patios is rounded out by high-quality accessories and effective cleaning and maintenance products. Meanwhile, planeo's services go beyond the trade in floor coverings. We put great emphasis on the idea of service in everything we do. We deal with the topics of material, handling and realisation in such detail that we can provide you with an adequate solution for many different situations on the building site. To make things more clear, you can find useful tips and instructions in our guides with articles and videos. Beautiful flooring and more? Realise easily with planeo.
| item no. | TK-20x65-SG_conf |
|---|---|
| Manufacturer | planeo |
| suitable for | Wall, Gable, Base |
| Look | Wood effect |
| Width in mm | 65 |
| Thickness in mm | 20 |
| Material | Wood |
| Piece per package | 8 |
| EAN | 4062212049013 |
| Shipping group | XL |
| Construction | Rhombus bar |
| Package Content | 28.8 rm |
|
Show all data ▼
|
|
| Downloads | |
|
|
|
We will help you with your questions!
A specialist adviser will be happy
to advise you personally.
☎ +49 5222 960 4810
Mon - Fri: 9am - 6pm
Sat: 9am - 2pm
Variant: DIY-Instruction
 button
In order for the facade to have the desired longevity, it is essential that the substrate is load-bearing. The building can also be insulated before the facades are applied.
ATTENTION: Please maintain at least 30 cm ground clearance for splash water protection on wooden buildings.
Before installation, it is imperative that the official installation instructions, which are included in every package, are followed, otherwise all warranty and guarantee claims will be void!
 button
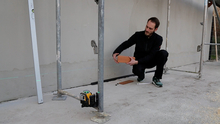
Before attaching the substructure, first, make markings to determine the positions of the battens and then mount them. Also, plan corner or end profiles at the corners and dowel the profiles to the masonry. To ensure that the facade is also well ventilated, drill ventilation holes in the battens. The battens are now placed at a maximum distance of 65 cm from each other. Also plan for board joints and edge distances and double-fix the substructure at the joints.
Tip: You can attach grids to the gable and base to protect them from small animals.
 button
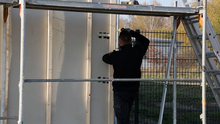
Mark all the positions of the Starclips with the help of a chalk line and place the Startclips in a well aligned position. Stick the Compriband onto the end profiles and screw the profiles to the corners of the building. Small animal grids can also be attached to the base termination as protection. Now the facade cladding can be attached. With the help of a rubber mallet, you can fix the next rows to the already mounted facade.
ATTENTION: Please note that edge distances of approx. 10 mm should be observed.
Material:
- Exterior cladding
Tools:
- Spirit level
- Striking cord
- Crosscut saw
- Battens
- Folding rule
- Pencil
- Cordless screwdriver
- Rubber mallet
- Starting clips
- Spacer
optional:
- Small animal protection sleds
- Waterline laser
- Hammer
- Straightedge
- Edge trim profiles
- Facade edging profiles
 button
  button
  button
 Individual offer?
Are you looking for a lower price? Just ask us for an individual offer!
