1
2
3
We just need your E-Mail and shipping address.
Feel free to add more samples to your sample cart afterwards.
We just need your E-Mail and shipping address.
Feel free to add more samples to your sample cart afterwards.
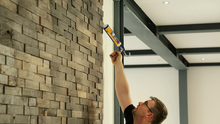
You can easily create maximum attention for selected wall areas with planeo WoodWall. The warm wood facing is a convincing counterpart to natural stone wall cladding.
planeo is the brand for professional solutions with tested quality. In our extensive range, you will find first-class products for home and garden, from floors to wall coverings to decking: we offer you suitable items with a top price-performance ratio for almost every requirement and budget. We also have product lines such as carpets, wall paints, wallpapers and doors. The range of attractive offers for walls, floors and patios is rounded out by high-quality accessories and effective cleaning and maintenance products. Meanwhile, planeo's services go beyond the trade in floor coverings. We put great emphasis on the idea of service in everything we do. We deal with the topics of material, handling and realisation in such detail that we can provide you with an adequate solution for many different situations on the building site. To make things more clear, you can find useful tips and instructions in our guides with articles and videos. Beautiful flooring and more? Realise easily with planeo.
| item no. | WANDBWH01SB |
|---|---|
| Manufacturer | planeo |
| Length in mm | 610 |
| Width in mm | 150 |
| Thickness in mm | 10-20 |
| Material | Wood |
| suitable for | Bedroom & living room, Hallway & Corridor |
| Installation type | glue |
| Look | Wood effect |
| Wood type | Driftwood |
| Special features | Handmade, Reclaimed wood |
| EAN | 7640165924525 |
| Collection | WoodWall |
| Piece per package | 11.0 |
| Shipping group | S |
| Weight | 9,87 kg/Packing |
| Package Content | 1.01 m² |
|
Show all data ▼
|
|
| Downloads | |
|
|
|
|
|
|
We will help you with your questions!
A specialist adviser will be happy
to advise you personally.
Variant: DIY-Instruction
 button
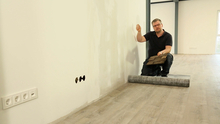
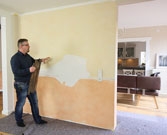
Before gluing the wall covering, the substrate must be load-bearing, clean, dry and even. Prime the substrate so that a permanent bond to the wall can be created. In the next step, mark the area to be glued with a pencil and a spirit level. Make sure that there is a gap of approx. 2-3 mm between the flooringor ceiling and the wall covering.
ATTENTION: The wall covering is not suitable for gluing it to a wallpaper!
 button
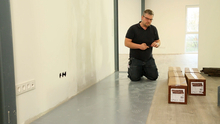
The wooden planks should be stored horizontally in the room in which they are to be installed for at least 48 hours before the installation in the packages. This will allow the material to acclimatise the room temperature and it will not "work" as much after the installation.
Before laying, it is imperative that the official laying instructions, which are included in each package, are followed, otherwise any claim to warranty and guarantee will be invalidated!
 button
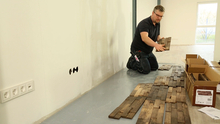
Open several cartons at the same time and use panels mixed from different cartons to achieve an appealing look. For the time being, lay out the first row provisionally without mounting adhesive. Now make marks on the cut edges of the planks and cut them on the back with a chop saw or jigsaw.
Tip: If you only want to lay half a wall, you can attach tacks to the wall for support. These can be removed after the installation adhesive has dried.
 button
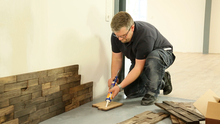
Now start gluing the planks from left to right. Spread about 6-7 dots of the mounting adhesive on the back of the first panel. Then press the panel firmly against the wall. Pay attention to the set markings on the wall. The other panels are also attached to the wall with a minimum distance to the panel that is already stuck. Start the second row with an offset of ½ or ¾ so that the cut edges are not all on one level.
Tip: Trim the last row with a hand-held circular saw or a table saw to avoid possible waves in the wood and to get a nice flow of the cut edges.
 button
Finally, you can hide the cut edges of the wall covering with a wooden or aluminium strip. Again, place a few glue dots in corners with the assembly glue and apply a little pressure to make the moulding fit snugly.
Material:
Tools:
optional:
Wall subfloor test subfloor preparation for a wall cladding
Buy wood facing wall cladding - planeo Indo
Redesigning walls in the living room with planeo wooden slats
Attaching antique wood facing planeo Indo
Sticking kitchen backsplash onto old tile backsplash
Redesigning walls with paint & composite panels
Installing a shower back panel with planeo wallboard
Renovate shower without tiles with large-format panels
planeo wall facing - wall claddings - wall coverings - bathroom wall renovation
Wall claddingin concrete look
Bathroom redesign - renovate the floor and the walls in an old bathroom with planeo
Drywall lightweight cladding walls - gluing self-adhesive wall cladding to chipboard
Are you looking for a lower price? Just ask us for an individual offer!
 button
  button
  button
  button
  button
  button
  button
  button
  button
  button
  button
  button