1
2
3
We just need your E-Mail and shipping address.
Feel free to add more samples to your sample cart afterwards.
We just need your E-Mail and shipping address.
Feel free to add more samples to your sample cart afterwards.
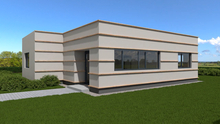
For decades, Zierer Fassaden GmbH has been regarded as an expert for impact-resistant and break-proof polyester fibreglass on walls. The specialist in glass fibre reinforced plastic from Gronau in the western Münsterland, Nordrhein-Westfallen, participates in major national and international European trade fairs.
| item no. | ZI01611012 |
|---|---|
| Manufacturer | Zierer |
| Collection variant | PS1 |
| suitable for | Wall, Gable, Base |
| Look | Plaster effect |
| Length in mm | 1115 |
| Width in mm | 359 |
| Thickness in mm | 14.5 |
| Material | Plastic |
| Colour | yellow |
| Piece per package | 9 |
| EAN | 4399902003124 |
| Gloss level | matte |
| Shipping group | XL |
| Deck size | 1090 x 349 mm |
| Absolute dimensions | 1115 x 359 mm |
| Construction | Facade panel |
| Laying direction | horizontal |
| Laying |
Installation takes place on a vertical substructure at a distance of 25cm as a ventilated façade from bottom left to top right |
| Fastening |
by means of screws or nails in the screw groove of the façade panels |
| Number of fasteners | Countersunk screws V2A Torx3x35mm Requirement approx.11pcs./m² |
| Surface | strukturiert |
| Weight | 25,09 kg/Packing |
| Package Content | 3.4 m² |
|
Show all data ▼
|
|
| Downloads | |
|
|
|
We will help you with your questions!
A specialist adviser will be happy
to advise you personally.
Variant: DIY-Instruction
 button
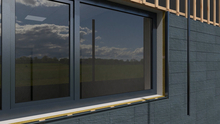
First, attach the substructure horizontally to the building. To ensure that the facade is well ventilated, attach the vertical supporting battens at a distance of 30 cm from each other. Now attach the start profiles and ventilation profiles horizontally aligned at the end of the battens.
ATTENTION: Please ensure that the distance of 3 cm to the substrate is maintained.
Before mounting, it is imperative that the official installation instructions, which are included in each package, are followed, otherwise any claim under warranty and guarantee will be void!
 button
The facade panels are mounted from left to right. At window areas, also mount end and corner profiles. Now you can install an additional lower ventilation profile. In the area of the inner corners, U-profiles are used, which have an insertion on both sides for the facade panels.
 button
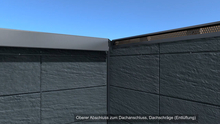
In the last step, we recommend that you install an upper termination. This ensures that the roof slope is also well ventilated.
Material:
Tools:
Are you looking for a lower price? Just ask us for an individual offer!
 button
  button
  button